Before we start about the future of Artificial Intelligence, let’s see some info from Wikipedia about Deep learning, JavaScript, Node.js, and TensorFlow.
Wikipedia: “Deep learning (also known as deep structured learning) is part of a broader family of machine learning methods based on artificial neural networks with representation learning. Learning can be supervised, semi-supervised, or unsupervised.
Deep learning architectures such as deep neural networks, deep belief networks, recurrent neural networks, and convolutional neural networks have been applied to fields including computer vision, machine vision, speech recognition, natural language processing, audio recognition, social network filtering, machine translation, bioinformatics, drug design, medical image analysis, material inspection, and board game programs, where they have produced results comparable to and in some cases surpassing human expert performance.”
Wikipedia: “JavaScript often abbreviated as JS, is a programming language that conforms to the ECMAScript specification. JavaScript is high-level, often just-in-time compiled, and multi-paradigm. It has curly-bracket syntax, dynamic typing, prototype-based object-orientation, and first-class functions.”
Wikipedia: “Node.js is an open-source, cross-platform, back-end, JavaScript runtime environment that executes JavaScript code outside a web browser. Node.js lets developers use JavaScript to write command-line tools and for server-side scripting—running scripts server-side to produce dynamic web page content before the page is sent to the user’s web browser.
Consequently, Node.js represents a “JavaScript everywhere” paradigm, unifying web application development around a single programming language, rather than different languages for server- and client-side scripts.”
Wikipedia: “TensorFlow is a free and open-source software library for dataflow and differentiable programming across a range of tasks. It is a symbolic math library and is also used for machine learning applications such as neural networks.
It is used for both research and production at Google. TensorFlow was developed by the Google Brain team for internal Google use. It was released under the Apache License 2.0 on November 9, 2015.”
Ok, after Wikipedia gave you a clue of what we are going to talk about in this article we can take the wheel from here.
So, if you’ve coded any application especially a web application, you’ve probably noticed that you can’t do anything unless you use JavaScript.
It started as a front-end based language but with the birth of Node.js, we can use JavaScript for the backend as well. This can make our life easier since we can have a full web application in one codebase.
Now, with the high rise of Artificial Intelligence (AI) in recent years, we’ve started to implement it everywhere, sometimes even too much, but it is what it is, it is a trend, and that how things are going right now.
AI itself is “magic”, many people don’t know how to use it properly, but still know that they will get superhuman results if they implement it. Now, if you want your results on steroids and complicate your understanding of the solution, even more, you start using Deep Learning.
Deep Learning opened new frontiers in AI because it helped us achieve new heights in many fields, as well as, improving what is already achieved.
The main languages used to work with Deep Learning are C/C++ due to its optimization power and Python due to its popularity that brought tons of very good optimized libraries and frameworks that can allow you to build a neural structure in few lines of code.
Now, remember a few lines ago when we said ONE CODEBASE makes things easier? Well, TensorFlow took this and made TensorFlow.js, which is a library for machine learning in JavaScript that will help you develop ML models in JavaScript, and use ML directly in the browser or in Node.js.
In this article, we are going to show you the future of Artificial Intelligence and how to set up your Node.js environment for Deep Learning, and how to start using it properly.
We are planning on turning this into series, where we are going to use JavaScript for Computer Vision, Reinforcement Learning, Natural Language Processing, etc.
Start with JavaScript and TensorFlow
Setup the project
To start using it, you need to create a Node.js project. We are using WebStorm by JetBrains, where all its figured out, but if you use something different it’s all ok, you can create a Node.js project by:
- Installing Node.js which will automatically install npm. Then you can create a .js file and run it with “node name_of_the_file.js”. You can create a server and do this command and it will run a server on your local machine, follow Node.js official example to do that here. We’ve created a script.js file and just used a console log to print a message.
This is the code in our scirpt.js file.

Image 1: Runing a .js file with node
- The other way is by using an npm. You will create a folder with your project’s name, navigate inside and just run “npm init”. It will create a package.json file that is your configuration, where you will install other packages and libraries and manage them as you need. This is how we’ve created our project, with the difference that WebStorm took care of everything.
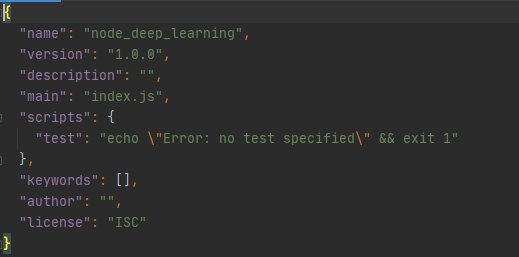
Image 2: Package.json file
If you didn’t get this fully, just search something on YouTube (Traversy Media is the KING).
Now, we can get on the AI part of the article.
To run TensorFlow, you will need to install it first, or do you? Well, you can, buy using npm or npx (only for the project (recommended)), or since it’s just a JavaScript library you can reference it with a script tag, this is the easiest and the laziest way, but hey, time is money, so here is our index.html file. And here are the other ways of doing this.
Then you just open the file in the browser and this is the outcome.

Image 3: Open .html file in the browser
Load and visualize the data
To load and visualize the data we will add the following code in our script.js file.
The code above consists of two functions. The first one getData(), fetches the data from the given URL, formats it to the wanted format, and then cleans it since there are cars where the mpg and the horsepower is NULL and that’s not what we want. To explain to you more why it is written the way it is, we will use a console log, that will show us the data in details.

Image 4: Response raw format
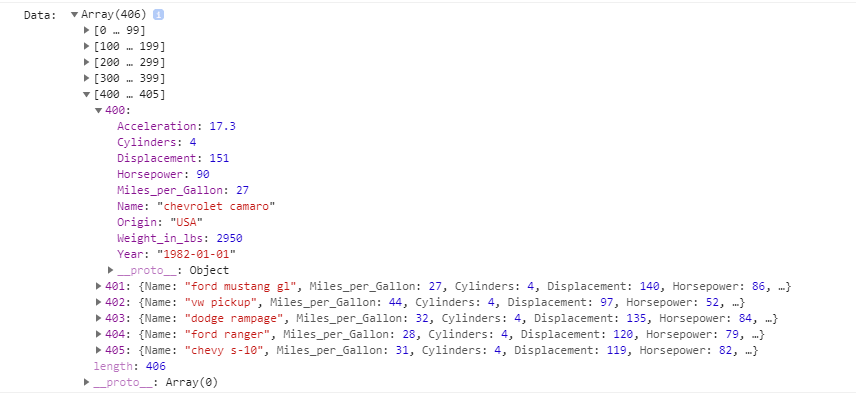
Image 5: Data in JSON format

Image 6: Cleaned data
The run() function just gets the data and format it so it can be represented in the chart shown below. The run() function fires up every time we refresh the page and the content is loaded with the help of the event listener.
After you add the code, just open the index.html file in the browser again. The following is what you will get if everything is fine so far.
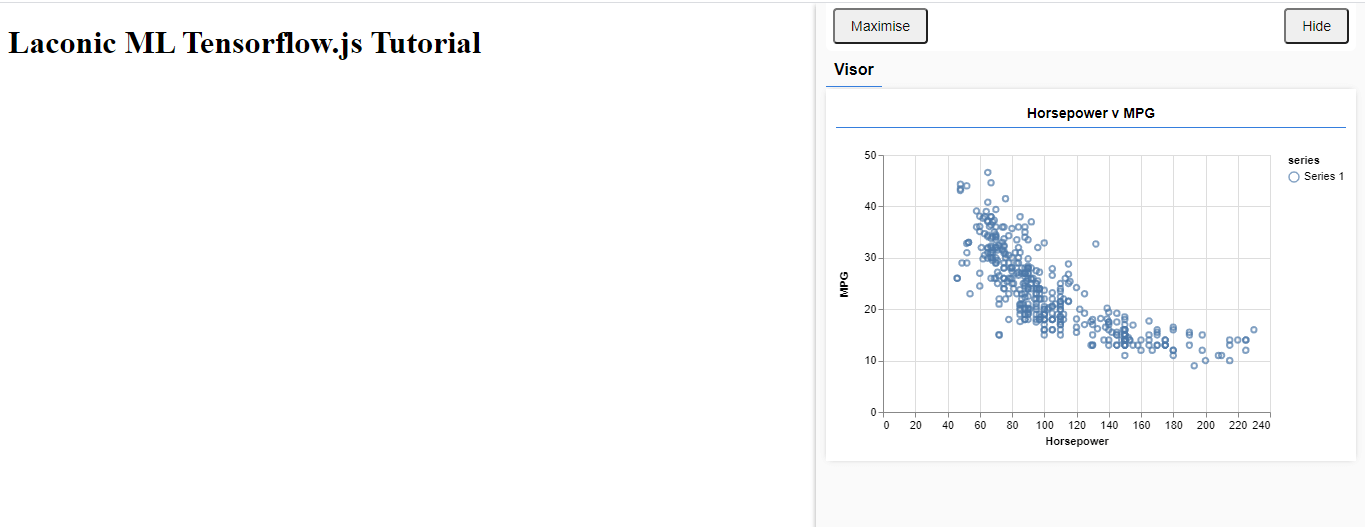
Image 7: Visualize data in the browser.
From Image 7 we can see how the mpg and horsepower is related. For a higher value of the mpg your car needs to have a lower value for the horsepower and vice versa.
Our goal will be, to train a model that will take the horsepower of a car and then predict the mpg for that car.
Define the model
The next step is to define the model. To do this, we will add the following code in our script.js file.
With the code above we instate a Sequential model in which input’s flow straight down to its output. Other kinds of models can have branches, or even multiple inputs and outputs, but in many cases, your models will be sequential.
Then we add an input layer to our network, which is automatically connected to a dense layer with one hidden unit. A dense layer is a type of layer that multiplies its inputs by a matrix (called weights) and then adds a number (called the bias) to the result. As this is the first layer of the network, we need to define our inputShape. The inputShape is because we have 1 number as our input (the horsepower of a given car).
units parameter sets how big the weight matrix will be in the layer. By setting it to 1 here we are saying there will be 1 weight for each of the input features of the data.
At last, we create the output layer with one unit.
We add the code above into our run() function and this is what we get.

Image 8: Summarize the layers of the model
Prepare the data for training
To be able to train the data, we need to convert the data to tensors, that will help use the full power of TensorFlow.js.
To do that, we can add that we can add the following code in our script.js file.
With the code above, firstly we are shuffling the data. Shuffling is important because typically during training the dataset is broken up into smaller subsets, called batches, that the model is trained on. Shuffling helps each batch have a variety of data from across the data distribution.
Then we convert our data to tensors. Here we make two arrays, one for our input examples (the horsepower entries), and another for the true output values (which are known as labels in machine learning). We then convert each array data to a 2d tensor. The tensor will have a shape of [num_examples, num_features_per_example]. Here we have inputs.length examples and each example has 1 input feature (the horsepower).
Next, we do another best practice for machine learning training. We normalize the data. Here we normalize the data into the numerical range 0-1 using min-max scaling. Normalization is important because the internals of many machine learning models you will build with tensorflow.js are designed to work with numbers that are not too big. Common ranges to normalize data to include 0 to 1 or -1 to 1. You will have more success training your models if you get into the habit of normalizing your data to some reasonable range.
Train the model
After we get our data, ready, we need to train the model. To do that you need to add the following to your script.js file.
We have to ‘compile’ the model before we train it. To do so, we have to specify the number of very important things:
- optimizer: This is the algorithm that is going to govern the updates to the model as it sees examples. There are many optimizers available in TensorFlow.js. Here we have picked the adam optimizer as it is quite effective in practice and requires no configuration.
- loss: this is a function that will tell the model how well it is doing on learning each of the batches (data subsets) that it is shown. Here we use meanSquaredError to compare the predictions made by the model with the true values.
Next, we pick a batchSize and a number of epochs:
- batchSize refers to the size of the data subsets that the model will see on each iteration of training. Common batch sizes tend to be in the range 32-512. There isn’t really an ideal batch size for all problems and it is beyond the scope of this tutorial to describe the mathematical motivations for various batch sizes.
- epochs refer to the number of times the model is going to look at the entire dataset that you provide it. Here we will take 50 iterations through the dataset.
model.fit is the function we call to start the training loop. It is an asynchronous function so we return the promise it gives us so that the caller can determine when training is complete.
To monitor training progress, we pass some callbacks to model.fit. We use tfvis.show.fitCallbacks to generate functions that plot charts for the ‘loss’ and ‘mse’ metric we specified earlier.
Then we add the following code to our run() function, and this is the result we get.

Image 9: Visualize the training method
Predict output
The final step is making the predictions. To do that we need to add the following code to our script.js file.
With the code above we generate 100 new ‘examples’ to feed to the model. Model.predict is how we feed those examples into the model. Note that they need to have a similar shape ([num_examples, num_features_per_example]) as when we did the training.
To get the data back to our original range (rather than 0-1) we use the values we calculated while normalizing, but just invert the operations.
.dataSync() is a method we can use to get a typedarray of the values stored in a tensor. This allows us to process those values in regular JavaScript. This is a synchronous version of the .data() method which is generally preferred.
Finally, we use tfjs-vis to plot the original data and the predictions from the model.
Then we add the following code in our run() function.
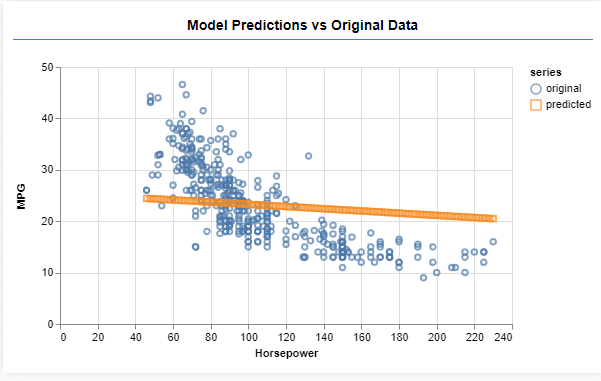
Image 10: Predicting the output
On Image 10 we have the prediction for the 100 values we’ve given to the model. Our model performs what is known as linear regression which tries to fit a line to the trend present in input data.
Conclusion
So, this is just a scrape of the surface. If you are new to JavaScript and Node.js in particular we suggest you take a look at it. It is very powerful, especially for building real-time, IoT, streaming apps, which combined with AI can be the real deal.
We hope that this will give you another perspective on all AI and especially Deep Learning hype, and will show you that Python is not the answer to every AI problem and project.
Check our older articles below, you might find them helpful.
- FREE Computer Science Curriculum From The Best Universities and Companies In The World
- How To Become a Certified Data Scientist at Harvard University for FREE
- How to Gain a Computer Science Education from MIT University for FREE
- Top 50 FREE Artificial Intelligence, Computer Science, Engineering and Programming Courses from the Ivy League Universities
- Top 10 Best FREE Artificial Intelligence Courses from Harvard, MIT, and Stanford
- Top 10 Best Artificial Intelligence YouTube Channels in 2020
To download the whole project you can visit our GitHub repository here.
Our article is inspired by Tensorflow.
Like with every post we do, we encourage you to continue learning, trying, and creating.

